

 Español
Flash is a one of the top 10 common plastic problems that most plastic injection molders usually encount.
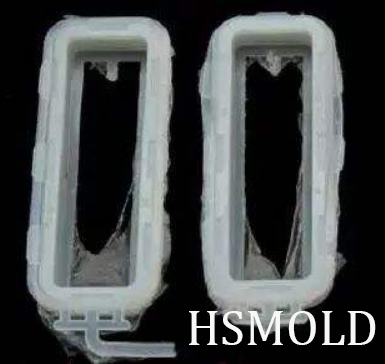
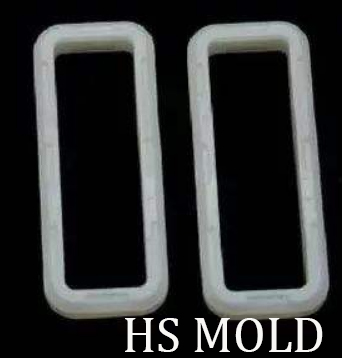
The issue occurs when some molten plastic escapes from the mold cavity and forms a thin plastic sealing on the face of injection molded part.
Flash can appear on the part’s edge along the parting line of the mold, or anyplace where the mold has metal meeting metal to form a boundary of the part. Though troubleshooting flash is difficult, molders spare no efforts to remove the thin or annoying sealing that affects appearance greatly and suggests poor part quality.Flash may occur during the filling process or at first injection stage, or during the pack/hold phase. Neither conventional parts nor thin-walled parts are immune. With overmolding, material leaks between the base material and the mold instead.
Flash can be attributed to several reasons, including variations in the process, mold issues, machine problems, or material issues.
Machine
Impropper clamp force
Either too much or insufficient Clamp force may lead to flash. Always remember, the machine clamp force must be greater than the pressure in the cavity (that is, clamp opening force), to sufficiently hold the mold plates shut.
Remedy Adjust pack/hold pressure or use a press with proper clamping pressure.
Inadequate sprue bushing support
During injection molding process, the pack/hold pressure may push the mold parting line apart. Inadequate support for the sprue bushing can transfer pressure to the parting line, too. Thermal expansion in the sprue bushing can hold the mold open and cause flash to develop.
Remedy For non-sprue-gated parts, check thermal expansion of sprue bushing under production conditions. Shorter bushing may be needed.
Mold
Parting line mismatches
Parting line mismatches can be caused by dirt, dust, contaminants, or residues that keep the mold from closing properly. Old or worn mold cavities that no longer fit together tightly can also cause flashing. With injection molding, the pressure that’s applied on mold plates can deform these metal surfaces. Complex part geometries can cause parting line mismatches, too.
Remedy
Clean mold surfaces and inspect cavity for any obstruction to proper clamping. Also check for a clamp misalignment, tool damage, uneven tie bar stretch, or improper machine leveling. Use pressure-sensitive paper to check pressure on parting line in flash area and non flash area while the tool is in the press.
Improper venting
Improper venting also causes flash. If plastic material is stiff, the mold’s vents may not be deep enough. Problems with mold design aren’t always to blame. Plastic flashing can also be caused by old or worn vents that no longer meet required tolerances.
Process
Processing issues that lower viscosity also cause flashing in molded parts. The specific causes include excessive melt temperature, overly-long residence times, moisture from inadequate drying, and the use of too much coolarant with lubricating vehicle.
Remedy
Optimize processing conditions
Test melt temperature to confirm it is not above supplier’s recommended limit. Check melt flow rate before and after molding for signs of degradation. Minimize melt residence time. If resin is hygroscopic, check moisture content. Try different lot of resin. Only as a last resort, reduce injection rate.
For more information about flash, the prevention of flash, contact market@hsmolds.com