

 Español
As known, the manufacturing of plastic injection mold determines the quality of plastic molded parts, production effieciency and cost of finished products.Mold trial is run to solve any problems with the design, resin, tooling,machine. Thus procedures of mold trial is very important for a injection molder. Be sure to follow this nine-step process to make sure you’ll be making good parts through a successful trial.
Firstly, Keep the injection mold run on the press without any resin to verify the function of the mold
A. Check mold opening and closing condition at low pressure:
- Mold should beopened and closed by 3 times at fast, medium and slow speed. During the process, there should be no abnormal sound nor block phenomenon;
- Mold opening and closingshould go smooth without any interference.
B.Checkejection system of the injection mold (at low pressure)
1.Check the ejection action at fast, medium and slow speed.
2.Check whether ejector pins or sleeves on the flat surface will loose or get stuck after ejection.
3.Check whether ejector pins or sleeves on the slope surface is equipped with dowels to prevent loosening or rotating.
- Are there any abnormal noises and tremors in the ejection system (ejector pins or ejector blocks)
Mold Return Check
- Check mold return at fast, medium and slow speed for 3 times each to see if it can return to position (reset);
2.After return, the top surface of the oblique ejector pins shall not be higher than the core by 0.1mm or level with the core;
3.Whether the contact of the limit switch for return is good or not;
- Whether the ejector pin interferes withslide(whether the slide returns to the position);
- Whether the mold is deviced with ejector return system (mechanical)
D.Slide function checking
1.Check mold opening and closing atfast, medium, slow speed for 3 times each to see if the slide movement is smooth or not
- Check whether slidereturns normally or not and if it interferes with the ejectorpins;
3.whether the positioning of slide is secure or not;
4.Check the moving sequence of hydraulic core-pulling device;
5.Check if slide gets stuck or damaged during the travel.
Secondly Test Balance fill into all cavities of the mould
1.Inject 5 shots consecutively and weigh the part
- Record the individual weight of each partin each cavity;
3.Reduce the volume of injection molding, and run 3 samples at the fill rate of 20%,50%,90%.
- Weigh and record the weight of each of the above unfilled parts;
- If weight difference between the heaviest part and the lightest part is within 2%, then it is acceptable. It indicates that indicates that the cavity fill is balanced, otherwise it is unbalanced at injectin and needs to be adjusted.
- If it is a single cavity mold, fillbalance test is also required.
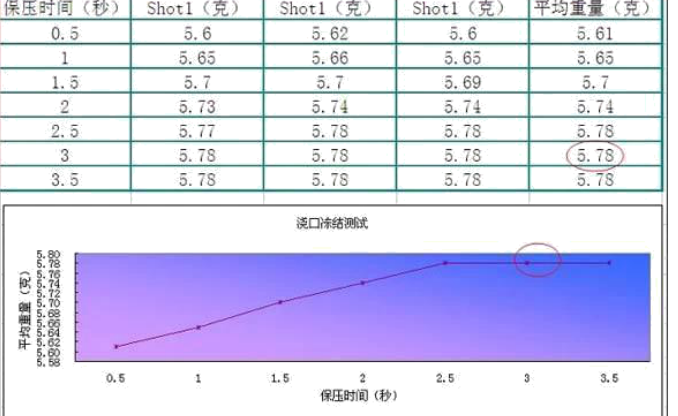
Thirdly Hold Pressure(Gate frozen) Time test
1。The holding time is first set to 1 second, 3 shots at each setting;
2。 as shown in the table, increase the holding time in turn, reduce the cooling time, so that the whole cycle remains the same (until the gate gets frozen and product weight does not increase);
3。 Set a number of different holding time as mentioned below, 3 parts at each setting. Weigh the product of the specified cavity and record the data into the table accordingly.
4 Determine the best holding time according to the chart.
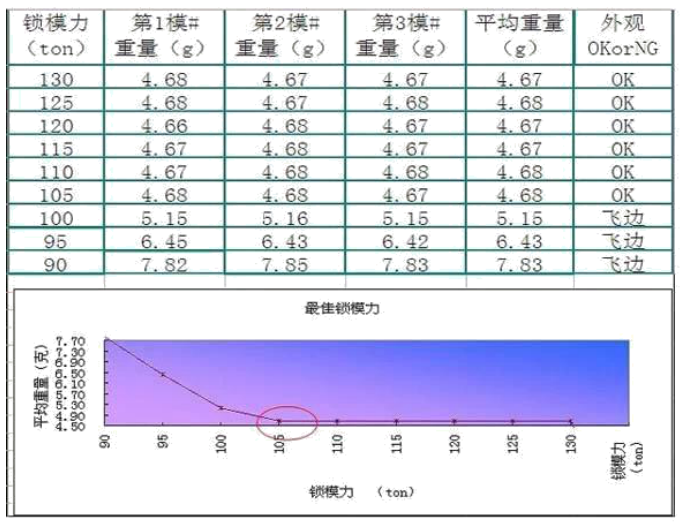
Forthly Determination of the optimum clamping force
- When hold pressure is set as the best, the mold locking force is set to within 90%of the maximum force, and inject3 shots with weight of each part recorded
2.Reduce the mold clamping force by 5 tons in turn and inject 3 shots at each setting with weight recorded until the weight of the product suddenly becomes larger by around 5% and flash occurs around the part.
Fifthly Method of determining the optimum cooling time.
1。 When at suitable injection molding process conditions (after the product is fully filled), estimate the cooling time (primary a longer cooling time to get the product completely cooled), inject 3 shots and measure its size;
- Record the product size in the following table and observe the deformation of the molded part
3。 Reduce the cooling time by 1 second at a time and inject 3 shots.
4。 Reduce the cooling time until the product begins to deform and the size begins to decrease.
5。 The size of each product should be measured after the molded part has been fully cooled (about 15 minutes).
6。Determining the optimal cooling time by considering the product size stability.
General formula for estimating cooling time:
1.Practical experience cooling time≥t(1+3t)……Mold Temperature below 60℃ ;
2.Practical experience cooling time≥1.5t(1+3t)……Mold temperature above 60℃ ;
(t represents the maximum wall thickness of the molding product )。
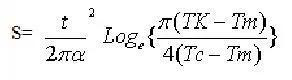
3.Calculation formula of theoretical cooling time:
s=Shortest cooldown(s)
t= thickness of plastic parts (mm)
α=thermal diffusion coefficient of the material (c ㎡/second)
Tk= demolding temperature of plastic parts
Tm=mold temperature( ℃)
Tc=barrel temperature ( ℃)
Sixthly Water Cooling Test
1.Use pressure gauge and flow gauge to measure and fill in the measured data.
2.Measure and record the diameter of the cooling pipe
- To find out the kinematic viscosity according to the cooling water temperature
4.The Reynolds number is calculated as follows: Reynolds number (Re)=3160× cooling water flow/cooling water diameter × kinematic viscosity
5.The flow of cooling water in turbulent state has better cooling effect (Re <2000 is laminar flow state; Re >4000 is turbulent (turbulent) state; Re =2000~4000 is transition state) 。
Seventhly Testing of mold cooling uniformity
- Use mold temperature measuring instrumentto measure the temperature of 10 points of core and cavity cavity and record the measurement in the following table.
The difference between the actual temperature and the average value of each measuring point should be less than 2°C, and if the difference from the average value exceeds 2°C, it indicates that the cooling effect of the injection mold is uneven, and the cooling system should be improved.
Eightly Viscosity Analysis of Dissolved Materials to determine Optimal Injection Speed
- 1.Record hydraulic oil temperature, solution temperature and mold temperature;
2。 First set the sol stop position, only use the first-class glue;
3。 Set the holding pressure and the holding time to zero, determine the starting position of the glue, gradually increase the injection speed;
- Adjust the injection speed to fill the 95%position of the molded part(checkwhether there is any padding material, and reserve the amount of 5–10mm);
5。 Record the maximum injection rate achieved when filling up to 95% of the glue;
6。 Record the maximum injection velocity and the peak injection pressure in the Injection Velocity Analysis Data Sheet.
7。 Gradually reduce the injection speed and increase the injection pressure, observe and record the peak injection pressure when filling up to 95% of the glue.
8。 determine the optimal injection speed from the graph.
In genera,the first mold tryout is very importanta for a new mold,We can evaluate if the mold function works well including injection system, ejection system and side cores system and so on by following above complete tryout procedure, Hopes that the experience we have been accoumulated for years help you to obtain good parts eventually and satisfied by customer.